Silhouette Vinyl Starter Kit!

Newvinylkit

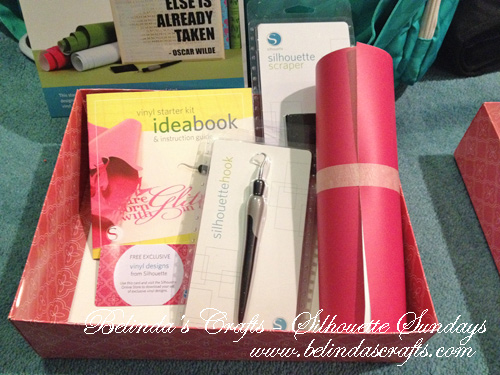
Ok so back during Thanksgiving break, Silhouette had a major sale on all products. I couldn’t resist purchasing a bunch of kits and a travel bag for my Silhouette.  I never wanted to buy them at full price. But with the major discounts I couldn’t turn my back. So with each kit you get a DVD with instructions, the tools, materials and about 10 free exclusive images.  This kit inclued the hook tool for removing the vinyl, the scrapper another tool to remove items, an ideabook, So it was a real bargain. I put them away until after the holidays because I knew I couldn’t commit the time.  But now I am pulling them out. One by one and as I learn, I shall share with you all the amazing things the Silhouette can do. So stay tuned for more.

Here are some examples of some great vinyl projects I have seen on the web that have me super excited to learn how to use it:

20 vinyl projects

Here are some places to buy the vinyl for your projects:

Overstock

Amazon

Have a blessed day! I am going back to watch the Super Bowl.

Belinda

Silhouette Sunday #3 – Organizing your files

organization1

Welcome back to Silhouette Sunday. Today I want to talk about using your files. I confess, I am weak when it comes to buying files. I buy files from the Silhouette store and I also obtain a whole lot of free files on the web. I will share those sources with you in future posts.

But the problem is that it can add up fast and before you know it, you have hundreds of files you just don’t know what you have and it seems daunting to organize.  But once you do it, you will be able to quickly locate the files you need and stop buying things you already have.

The first thing you should do is look at the categories that Silhouette has created in their store. They have 13 main categories and subcategories under each.This gives you an idea for a basic filing system and then from there you can expand to meet your needs. When you create your organizational structure around the Silhouette system, it makes it easy to know where to file the files once you buy them and quicker to find them later.

I have  attached included a list (in PDF format) of all the categories and subcategories.  Print them out for reference and then open up your Silhouette software.

To Create a Folder:

organization3

  • Click on Show Library icon
  • Then click on the New Folder icon on the top task bar or Right click on the My Library icon to create a new folder.

organization4


  • Then type the name for the folder. Use the PDF print out to guide you. Continue creating the 13 main categories and then you can go back and create sub categories (folders).

To create subcategories:

  • Click on the folder you want to create a subcategory under and click on the New Folder icon or right click the folder you want to have sub folders under.
  • Then name the folders.
  • Continue until you have as many as you like. I used their 13 main categories and then I modified a few to meet my specific needs.

Overall, you will find it easier to build off of their list because you will be able to file them as soon as you download them.

I still find this machine incredibly fun to use and look forward to expanding my knowledge and sharing it with you. Thanks for joining me today.

Happy Crafting!!!

Belinda

What’s on Your Workdesk Wednesday – #236

Hello my oh so talented crafty friends!  Wow weeks fly by but this time of year it feels even faster.  I feel like scrooge because normally my decorations go up right after Thanksgiving and I mail off all my holiday cards on December 1st. It is not for the lack of cards. We took our family photo before Thanksgiving and printed up photo cards (Last year I started using photo cards and made cards for a select group of people to reduce the stress.)  I just seem to be busy or flat out procrastinating.  Not sure why.

Anyway, enough of the ‘Mysteries of Belinda’ and let me talk desk talk. Since that is our Wednesday ritual.

A new cut file from my Slhouette.

A new cut file from my Slhouette.

Last week, Silhouette had and amazing sale – all cut files were 1/2 off and all materials were %50 off. So I loaded up on both because that doesn’t happen very often.  I bought a lot of home decor type files. This one is a little 3D Ledge village. I love it because it can fit on windowsills or shelves really easy.  I created a little winter village with them.

More of my desk.

More of my desk.

I cut up three and added a little detail and put them on one of the shelves I have to display art in my craft room. You can see the final project here.

On the left of my desk you can see some bookmarks that I cut out on my Silhouette for my son for an upcoming Marketplace Swap.  He filled out cute facts on each about the characters which are from a game he plays called Club Penguin. I realize that the house was assembled incorrectly (the door is opening the wrong way.)while typing this so I had to cut up another for the final winter scene.

I am going to get those cards out by this weeks end. That is my goal. Maybe by telling you all, it will keep me honest and move me out of this procrastinating funk!

If you haven’t learned about this amazing creative journey you can take every Wednesday, then head on over to Julia’s Stamping Ground and you will find desks from all around the world for What’s on Your Workdesk Wednesday.

I hope you all have a blessed day.

Belinda

Home Decor: Miniature Winter Village

I put them on one of my display shelves in my craft room.

I put them on one of my display shelves in my craft room.

Hello Everyone! I am so excited to share my latest little project.  I bought these 3D cut files during Silhouette’s big sale last week. It is a little winter village and they are sized to fit on to small ledges, windowsills or shelves. When I saw them,  I just fell for the simple white theme and I knew exactly where I would  put them. I placed them on my display shelf in my craft room where I usually display cards, pictures or my boy’s art work. But I decided I want to fill the shelves with winter decorations.  So I am looking for more cute projects to display on the shelves.

I apologize now for all the pictures but I wanted to capture the different angles.

They fit so nice on the shelf.

They fit so nice on the shelf.

The  houses came with fences and trees. I debated whether to put another tree on the other end of the shelf.  But as you can see below on the other end the cutest little bench that came with it as well.

Look at the cute little park bench.

Look at the cute little park bench.

These shelves are right at the top of the stairs and now I smile every time I pass this little village.

This is the view from the front.

This is the view from the front.

I kept the houses white and I added little wreath embellishments that I also found on sale at the Silhouette store.

I will be sure to post pictures of some of the other projects I am working on once I complete them.

Have a blessed day!

Belinda


Follow

Get every new post delivered to your Inbox

Join other followers: